Table of Contents
ST4 Wireless Video Transmission System Product Description
- Judy
- Jan 20, 2026
- 0 Comments
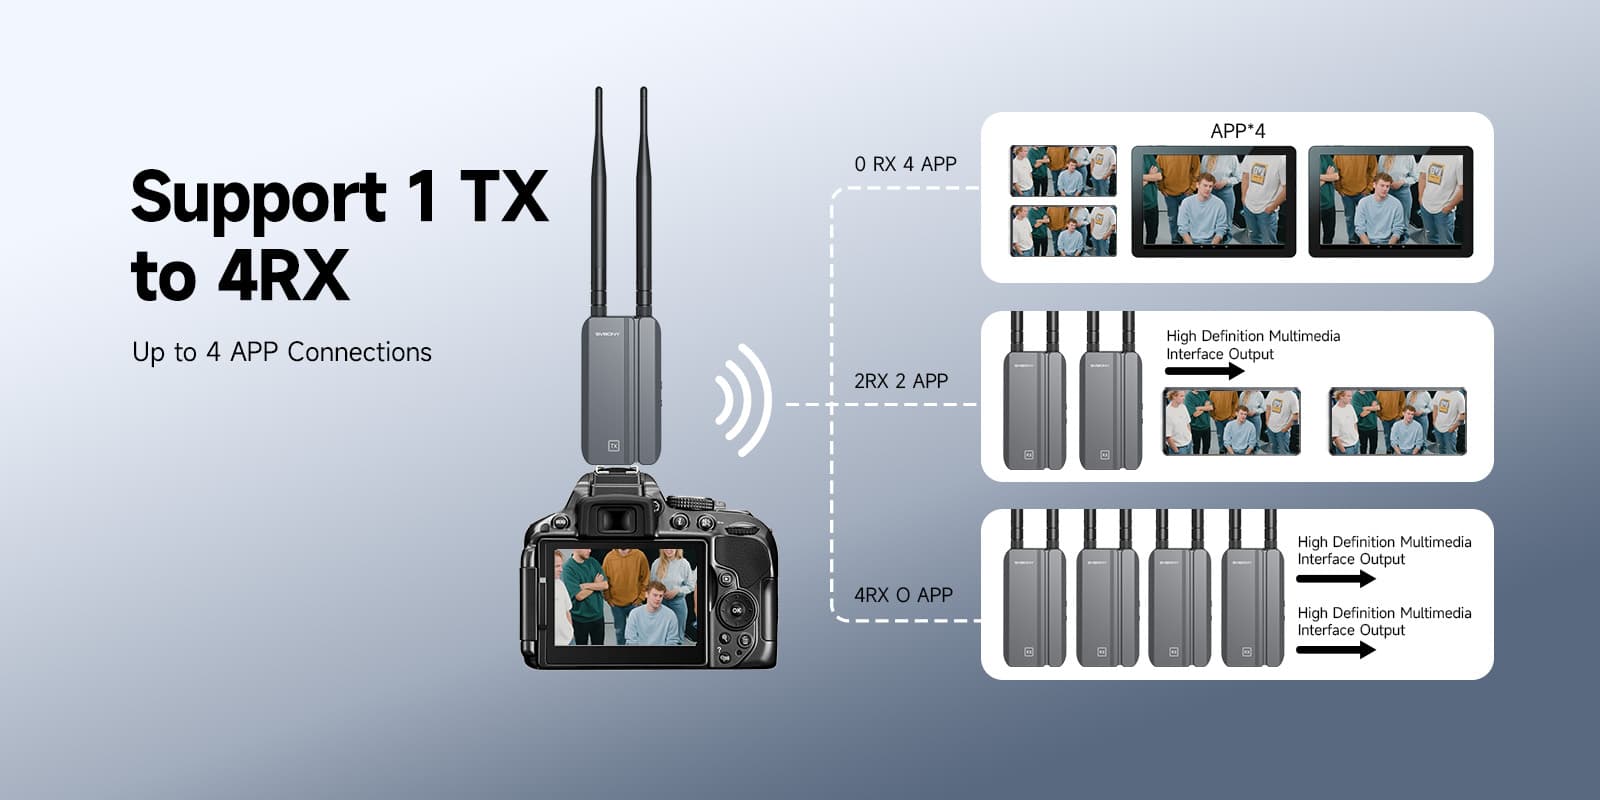
TransAir3 wireless video transmission system supports multiple receivers, up to four. With one receiver connected, the effective transmission distance in an open environment is 300 meters; with multiple receivers connected, the effective transmission distance in an open environment is 100 meters.
Detailed Operation Guide:
Installation, Power Supply, and Pairing:
1. First, install the antennas of the wireless HDMI transmitter and receiver, ensuring good contact and no looseness.
2. Power can be supplied via the Type-C port or by pressing the battery lock button and installing the NP-F battery on the back of the product.
3. The blue light will be solid when powered or when the battery level is above 20%; the blue light will flash when the battery level is below 20%. The signal indicator light will be solid blue when the signal connection is normal; it will flash blue when the signal connection fails.
4. The transmitter and receiver are pre-paired at the factory. To add a receiver or re-pair, simultaneously press and hold the pairing buttons on both the receiver and transmitter for approximately 5 seconds. The signal light will flash rapidly and then remain solid, indicating successful pairing.
Computer Screen Casting Connection Setup:
1. Connect one end of the data cable to the TransAir3 transmitter's HD data IN port and the other end to the computer's data port.
2. Connect the receiver's OUT port to the external display.
3. After entering the computer's settings interface, configure the external display to either duplicate or extend the signal as needed.
4. Adjust the monitor or TV's signal source to the corresponding signal port of the receiver.
Note: If the transmitter has no signal input or the receiver does not receive a signal, the external display will display a "NO VIDEO" message.
Camera Connection Setup:
1. Connect and secure the product base to the camera using screws.
2. Connect one end of the data cable to the transmitter's IN port and the other end to the camera's data port.
3. Connect one end of the data cable to the TransAir3 receiver's OUT port and the other end to the monitor's data port.
Infrared Remote Control Extension Connection Setup:
1. Connect one end of the data cable to the TV box's data interface and the other end to the transmitter's IN interface. Connect the infrared extension cable to the transmitter's infrared (IR) interface.
2. Connect one end of the data cable to the receiver's OUT interface and the other end to the external display's data interface.
3. After successfully projecting the TV box's display onto the external display, you can use the TV box's remote control or touch controls.
APP Connection Steps:
1. On your mobile phone or mobile device, go to the WLAN search page and find the product's WLAN name "JMxxxxxxxx". Enter the WLAN password (the factory default password is 12345678) and connect.
2. After connecting to WLAN, your phone may prompt "It seems there are other networks available. Do you want to switch networks?". Please select "No, thank you." to maintain the current connection.
Note: The prompt options may vary depending on the device. Please select the same or similar prompt options as the sample.
3. Open the APP and click the "CONNECT" button to monitor on your mobile phone.
Note: In some app versions, there will be an option to "Read and agree to the User Agreement and Privacy Policy" below the "Connect" button. Please ensure this option is selected; otherwise, clicking the "CONNECT" button may result in no response or a prompt to check the box.
4. After connecting, you can access the main page to monitor the screen on your phone or other devices.
Frequently Asked Questions
Connection Issues
1. If the power LED does not display, please check if the transmitter and receiver power supplies are working properly and if the power switch is on.
2. When using battery power, please check if the battery is sufficiently charged. Replace the battery if the charge is low. When using USB-C power, please use an adapter with a voltage of 5V 2A or higher, and check if the USB-C port has protocol functionality. Some phone USB-C adapters with protocol functionality may not output power.
3. If, at close range, the TX and RX connections fail to connect after two or more power-on attempts (i.e., the connection indicator light is off and the RX port displays "Waiting to connect"), please re-pair the transmitter and receiver. To re-pair: After powering on both the TX and RX devices (i.e., after the status indicator lights are off), simultaneously press and hold the "Pairing Button" on both the transmitter and receiver for 5 seconds, then release. Pairing will complete automatically. Successful pairing is indicated by the connection indicator lights on both the transmitter and receiver illuminating.
Playback Issues
1. If the monitor displays "Waiting for video source" when the RX is connected, please check if a video source is connected.
2. Please check if the video or image format of the camera output and video source matches the format supported by the wireless system, such as whether it exceeds 1080P resolution.
Video/Image Stuttering Issues
1. Check if the data IN/OUT cables are properly connected.
2. If the signal strength is too weak, try changing the frequency band or shortening the distance between the TX and RX devices.
APP Connection Issues
1. Please confirm that the WLAN is connected correctly.
2. If a "Cannot connect to WLAN" message appears, please check if you have selected the correct option.
3. Please ensure you have checked "Read and agree to the User Agreement and Privacy Policy".
TV box not working
1. Confirm the IR cable TX and RX are compatible.
2. Ensure there are no obstructions between the TX infrared cable and the TV box.
3. Confirm there are no obstructions between the RX infrared extender and the remote control.


Comments (0)