Table of Contents

TT106S Earhook Earbuds Receiver User Manual
- Sophia
- Aug 13, 2025
TT106S Earhook Earbuds Receiver User Manual
Product Introduction

Function Description of the Transmitter
| Serial Number | Keypad | Function Description |
| 1 | Microphone Interface | The microphone connects to the host device and supports voice output. |
| 2 | Display Screen | Display Features: Communication channel Volume level Signal strength Battery indicator |
| 3 | MUTE | One-Touch Mute Functionality |
| 4 | Up Key | Channel Number Adjustment |
| 5 | OFF | One-Touch Power Off; Channel Adjustment; Exit Pairing Mode; |
| 6 | Down Key | Channel Number Adjustment |
| 7 | Type-C | Type-C Charging Suppor |
| 8 | AUX | Audio Signal Input Suppor |
| 9 | PAIR | One-Touch Pairing |
| 10 | ID | Long-Press to Enter Channel Adjustment Mode; Channel Number Adjustment; |
Receiver Function Description
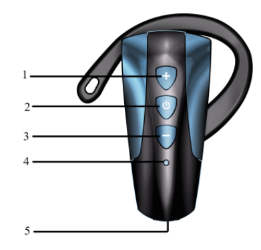
| Serial Number | Indicator Light | Status Description |
| 1 | Volume + | Adjust Receiver Volume + |
| 2 | Power On/Of | Long Press to Power On / Off |
| 3 | Volume - | Adjust Receiver Volume - |
| 4 | Indicator Light | 1.When the receiver successfully connects to the transmitter and communication is established, the blue LED flashes once every 2 seconds; 2.When the receiver is not connected to the transmitter, the blue LED flashes once every 1 second; 3.After successful frequency synchronization between the receiver and transmitter, the blue LED remains solid (steady on); 4.During charging, the red LED stays solid; when fully charged, the blue LED lights up; 5.Battery status indicator for the receiver |
| 5 | Type-C | Charging input 5V/1A |
TT106S User Manual
1. Turn on the tt106s transmitter and receiver
Press and hold the power button of the transmitter to turn on, and the display lights up. Press and hold the power button of the receiver to turn on (about 1 second, until the blue light of the display light turns on, and there is a "beep" sound to prompt successful startup)
2. Frequency Binding
Set the channel of the transmitter  first and then bind with one key. Press and hold the ID key to enter the channel adjustment mode. You can press the Off key
 , ID key, up and down keys to change the channel number. After adjusting the channel number, press and hold the "PAIR" key to bind with the receiver. In pairing mode, bring the powered-on receiver close to the transmitter host (within about 2 meters). The receiver can automatically match the same channel as the transmitter host. At this time, the blue light of the receiver is always on;
After pairing, the transmitter host short presses the "" key to exit the pairing mode. The transmitter host and the receiver can communicate normally. At this time, the blue light of the receiver flashes once every 2 seconds.
Note: After the receiver is connected to the transmitter, there is a "Connected" prompt tone. After the receiver is disconnected from the transmitter host, a "Disconnected" prompt tone is prompted.
3. Wear the tt106s transmitter and receiver
After the transmitter and receiver are paired, you can talk by connecting the transmitter to the microphone. The ear-hook receiver is worn on the right ear, and the sound of the transmitter can be heard.
Other functions
The receiver automatically shuts down after 20 minutes without signal.
The transmitter host is muted with one button . Short press the mute button "MUTE" to mute the transmitter host. At this time, the receiver cannot hear the voice of the transmitter host; short press the mute button "MUTE" again to resume speaking, and the transmitter host and receiver can communicate normally.
Precautions
1. When the device is not used for a long time, please charge the device once every 3 months to prevent damage to the battery in the device. (Because the device contains lithium batteries, if it is not used or charged for a long time, the lithium battery will be over-discharged and damaged)
2. If it is the first time for a travel agency or scenic spot to use the device, it is recommended to reset a relatively complex channel number for the device (please do not use the default channel directly) to avoid crosstalk problems caused by the same channel at the same scenic spot.
 TT106S-EN-DE-FR-IT-ES-RU-JP


Comments (0)